Friday, February 19, 2010

Portraits

For this photo I used an ISO of 200 and I manually set the white balanced. I enhanced the color of her coat in order for it to stand out from the bush that was behind her. I also like the contrast between the color of her tights against the snow.
For this portrait I used an ISO of 200 and I used a white balance set at sunny. I wanted the picture to look warm and portray a happy mood. I like that the wind was blowing her hair because it shows more movement in the photo. I also blurred the background slightly so the bricks would not be as prominent.
In this portrait I enhanced the color of her eyes in order for them to stand out more. An ISO of 200 was used and the white balance was manually set. The intent of the photograph was to have her looking as though there was something up in the sky. I wanted the picture to look peaceful also. 


Landscapes

This photo was taken with an ISO of 200 and the white balance was set manually. The object of the photograph was to show the willow tree by the pond. The photograph ended up having a more mysterious feel to it because there are many dark branches going across the photograph.
The intent of the photo was to show a landscape, but I also wanted to show the reflection of the trees in the water along with the details of the branches along the edges of the river. I used an ISO of 100 and manually set the white balance. I placed a texture in the background and erased it from everything except the snow in order for the snow to have more detail.

Annoying!

I took a picture of my car because currently the speakers do not work in my car. Since the speaker have been like that for about two months I put a boom box in the car. I took the picture when the sun was about halfway up the sky and I like it because it shows the reflection of the tree on the hood of the car.

I took this photo to show the snow because winter annoys me. I don't like how cold it is during the winter and I wanted to portray snow in my picture. This photo is very warm because of the sun light shinning on it which I like because it makes it seem as though it is warmer out.

Selective Focus


The main focus of this photo is the rose. I enhanced the color of the rose so it would be a brighter pink. I also placed it to the side so it would satisfy the rule of thirds and so the green of the tree would be shown in the background.

Line/Texture

The point of this picture was to show the texture in the ice. I wanted the leaf to be the main focal point of the photo, but I wanted the details in the ice to be evident in the background. 

The object of the photo was to show the parallel lines of the shadows of the trees. I wanted to show how the lines continued down the road. The shadows of the trees along with the curve of the road make the eye follow it across the photo.

Friday, February 12, 2010

Texture

The main object of the picture was to focus on the bright red color of the rose. I put the picture off to the right in order to satisfy the rule of thirds. I used a texture behind the picture to create an antique feel. I also burned the edges of the photo to highlight the texture and create interest.

Thursday, February 11, 2010

Forty Photos

The purpose in the photo was to create an image that would make her look as though she has wings. I wanted to create a graceful and calming photo through the use of layering. By layering the forty seven different photos I was able to create an image representing the wings. The girl is slightly positioned to the left in order to satisfy the rule of thirds. When taking the pictures I wanted her to be the main focus, but also to have something minor in the background which was accomplished by the shore across the lake.

Thursday, February 4, 2010

Shutter and Aperture

In this photo I used a high shutter speed and it ended up showing the detail of the chair and also the house in the background.


I used a normal shutter speed in this photo and I wanted to portray the happiness shown in her face.


In this photo I used a high shutter speed and I wanted to portray the path of the stones leading along the side of the lake.


I used a high shutter speed in this photo to show the leaves and the snow that were still on the tree.


Montage

In my montage I used a photograph of a coffee cup because I am a very energetic person and I am also very fond of coffee. The pink color at the bottom demonstrates that I'm very vibrant and I enjoy bright colors that stand out. In the background there is a photograph of the northern lights shown behind some trees and this also shows that I am very vibrant and I also enjoy nature. The scissors represents that I love the simplicity of being able to do people's hair for different events or even cutting it. The lifeguard chair shows that I am a responsible person and I demonstrate that through my job as a lifeguard. The dragonfly represents that I am fond of nature and the beauty of the simply creatures in the world. I placed a texture in the background to add more personality and something else to look at because I have a dynamic character.

Tuesday, February 2, 2010

ISO


In this photo I used an ISO of 100. I wanted the berries in the photograph to be more infocus then the trees in the background.


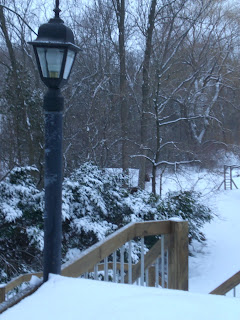
In this photo I used an ISO of 100 and I feel as though it worked well showing the different details of the light post as well as the trees in the background.


I used an ISO of 200 for this photo. The main purpose of the photo was to show the red and green branches in the flower pot.


In this photo I used an ISO of 50 to show the definition in the show and the details that are off in the distance.


Compensation

For this photo I used -1 for the compensation because the sun was shinning through the windows that was close to the jars.


This scene of the photo was very cloudy so I used a +1 so that it would look brighter. The trees still look very dark, but it shows a better variety of values.


The scene of this photo was very cloudy so I choose +1 as the compensation so that the picture would be brighter and the detail in the lamp would be shown.


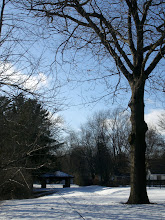
For this photo I used -1 compensation because even though it was not very sunny out it was very bright. By using a negative compensation it showed the bark of the tree better.